TAG
TAG- Camera Rawフィルター , トーンカーブ , レベル補正 , 特定色域の選択
2015年02月17日
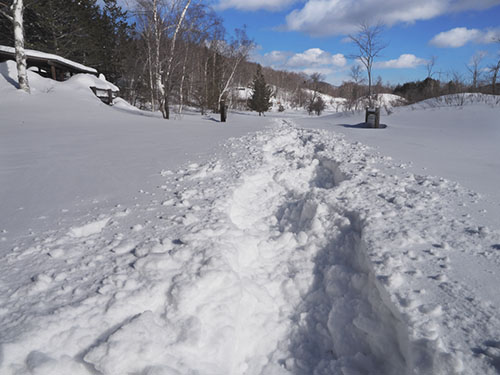
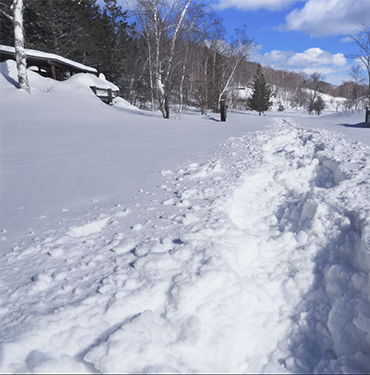
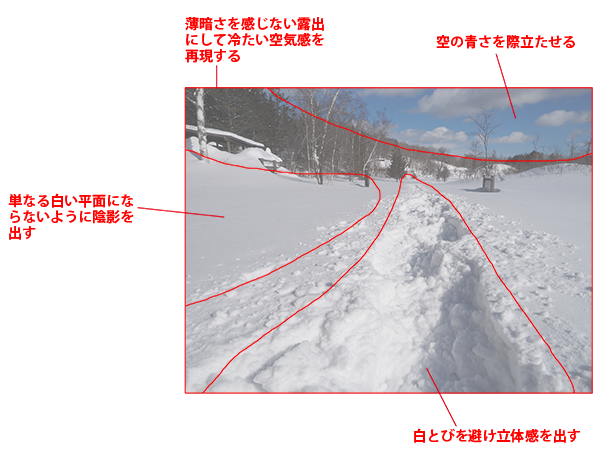
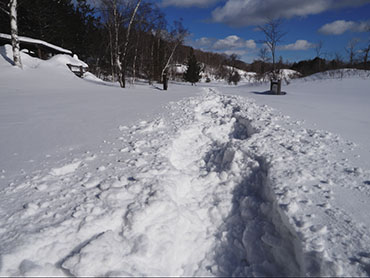
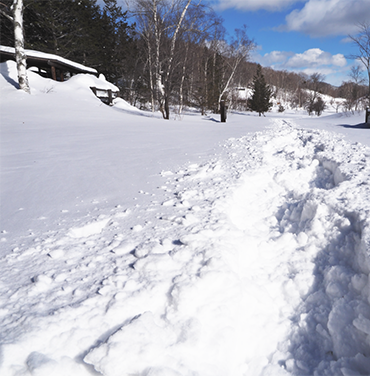
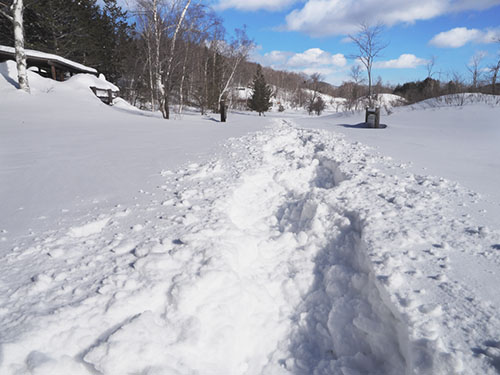
白一色である雪景色は、平面的になってしまいがちで、見たままの美しさをとらえるのはなかなか難しい。今回は、雪原の立体感や冷たさまでも表現するレタッチで、ドラマチックな白銀の世界を目指す。
雪や氷のレタッチは難しい。白さを出すために明るくすると白い平面になり質感が失せるし、陰影を求めて暗くするとくすんでしまう。
また、天候やシーンによっても補正の方向性は異なるため、パターン化したレタッチのテクニックは紹介しにくいのが実情だ。
そこで今回は、汎用的に応用できそうな「雪原」と「立体感」と「青空」を意識して雪景色を補正してみたいと思う。雪のあるシーンを補正する基本的な考え方が理解できるはずだ。
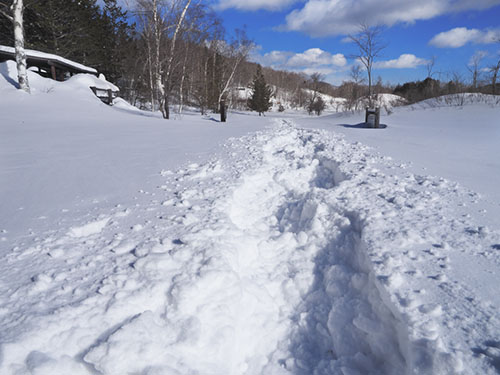
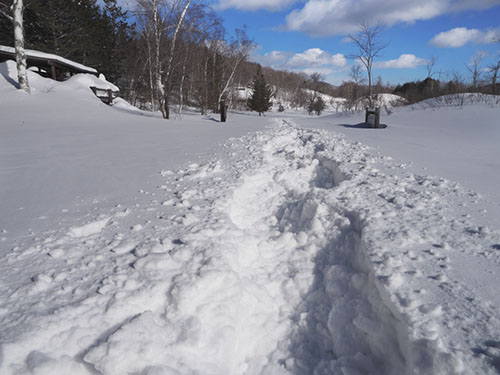
テーマ:雪の質感と冷たさを表現する
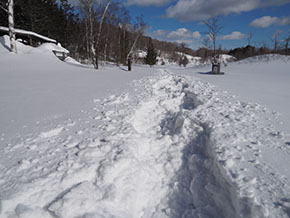
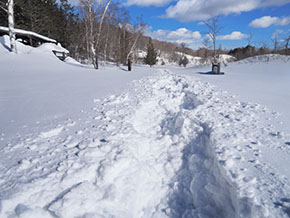
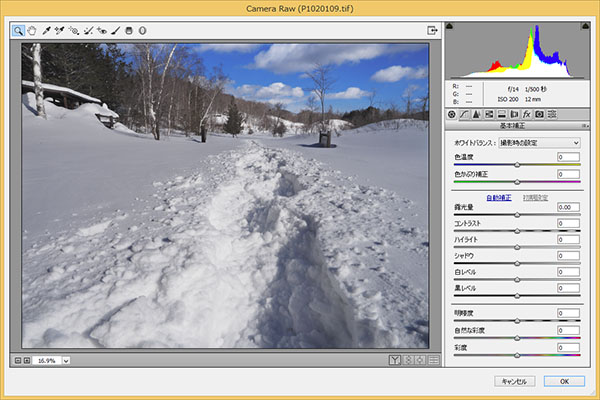
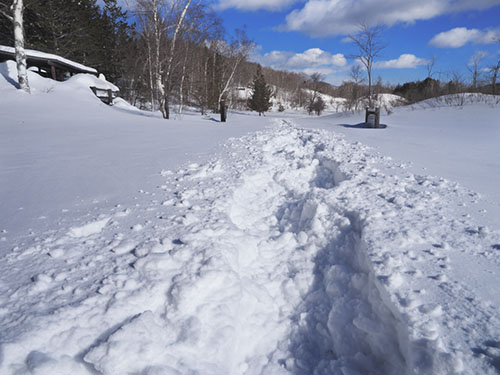
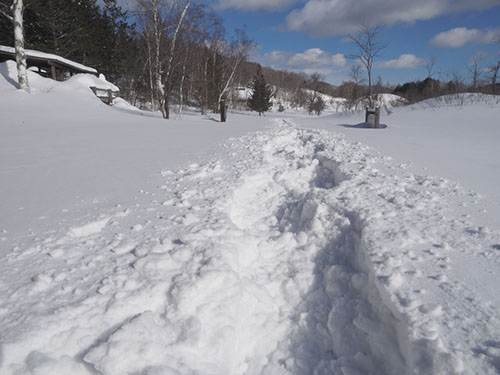
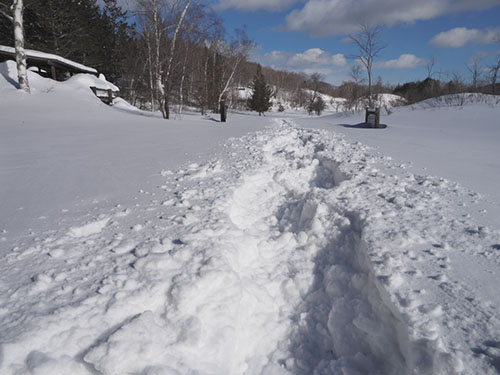
オリンパスOM-D E-M1 ZUIKO DIGITAL ED 12-60mm F2.8-4.0 SWD+MMF-3 絞り優先AE(f14 1/500秒) 補正なし ISO200 324分割デジタルESP測光 WB:オート
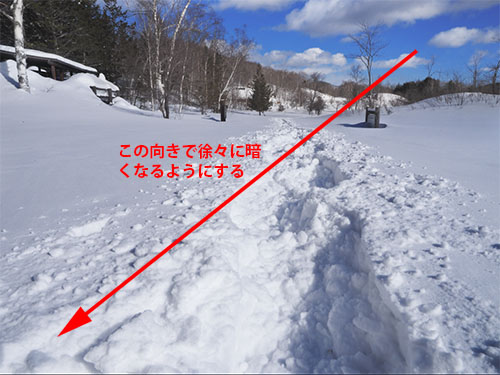
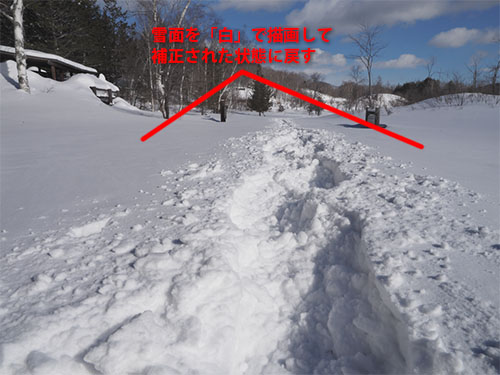
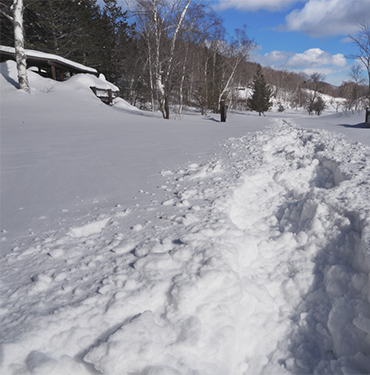
踏み跡のない雪景色は単なる白一色で立体感に乏しかったので、足跡を入れて雪の立体感を出してみた。レタッチでは、現場の冷たい空気感や雪原の質感が出るように仕上げている。
レタッチの設計
「補正前・後」と「レタッチの設計」拡大図はこちらをクリック ※別ウィンドウで表示
>>作例写真のダウンロードはこちらから
※作例写真を使ってPhotoshopの操作が学べます。画像の利用目的は個人利用に限ります。
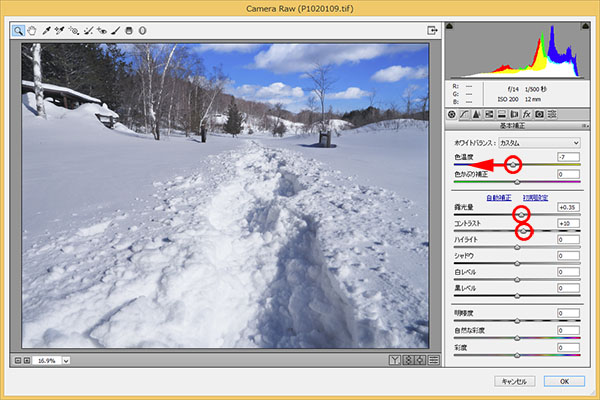
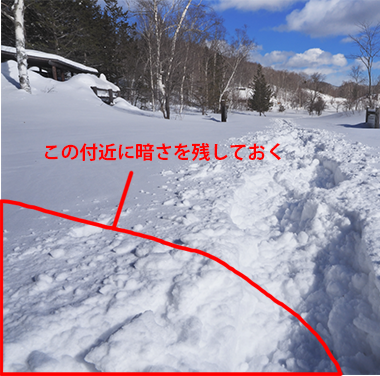
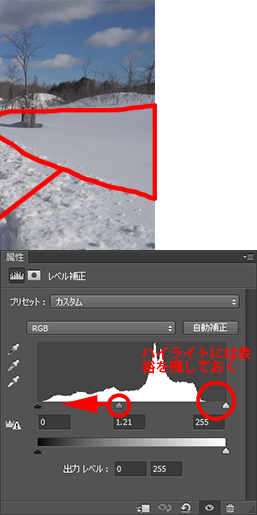
雪景色を補正するとき、注意したいのがハイライトの明るさ。「白い平面」にならないように注意すること。
また、単に明るくするだけでは白さが際立つ代わりに質感が失せてしまう。雪原の微妙な陰影を残すためには、露出のマイナス補正やコントラストを強めるなどの処理も必要だ。
とにかく、白さに捕らわれず「微妙な陰影」を活かすように補正すること。雪の白さにくすみを感じたときは色温度を下げ、青みを出すと澄んだ色彩が表現しやすくなる。
はじめに
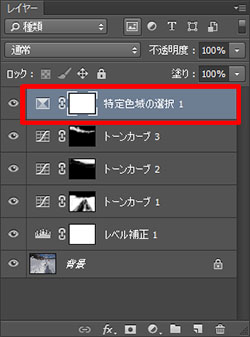
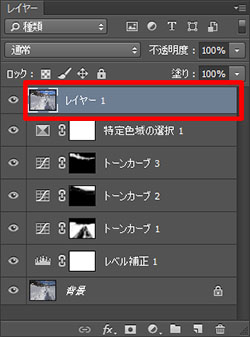
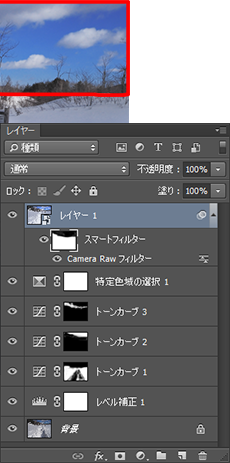
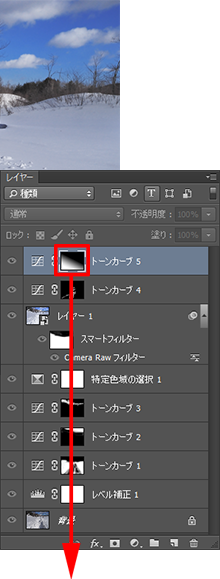
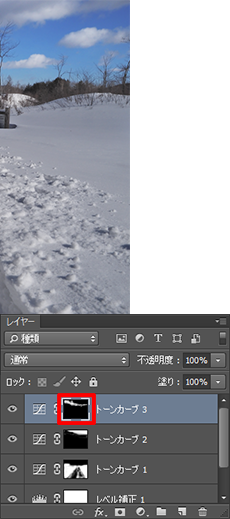
 補正のためのレイヤーの構成
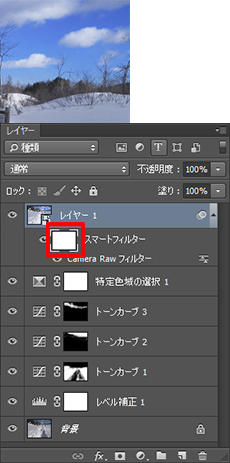
雪景色の場合、要所ごとに分けて補正することで質感や立体感が引き出せるようになる。
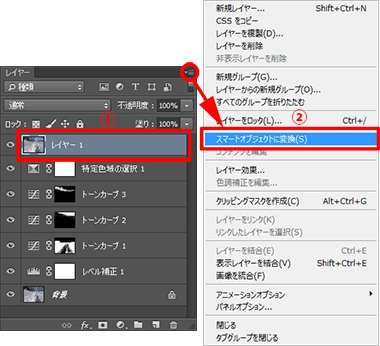
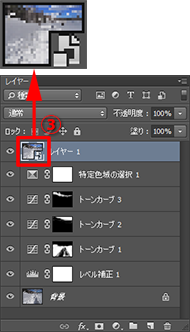
レイヤーの構成は、①が補正のベースとなる露出に整える「レベル補正」、②から④が左右の雪面、空、背後の木々を補正する「トーンカーブ」、⑤が空の色を出す「特定色域の選択」で、これらのレイヤーをまとめて複製したものが⑥。
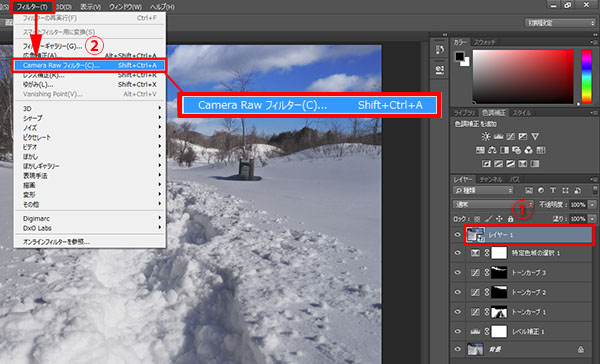
⑦は色温度補正用のCamera Rawフィルター、⑧は白とび軽減用の「トーンカーブ」、⑨は部分的に陰を作る演出の「トーンカーブ」、⑩は最終的な露出補正のための「レベル補正」だ。
①全体の露出を整える
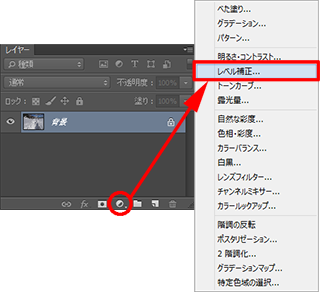
■STEP1 「レベル補正」を選択
まずは、全体の露出をイメージに近づくように補正する。ハイライトの階調を乏しくしないようにするため、ハイライトを変化させずに補正できる「レベル補正」か「トーンカーブ」を使うこと。ここでは、「レイヤー」パネル下部の ![]() ボタンから「レベル補正」を選択し、調整レイヤーの「レベル補正」を使用する。
ボタンから「レベル補正」を選択し、調整レイヤーの「レベル補正」を使用する。
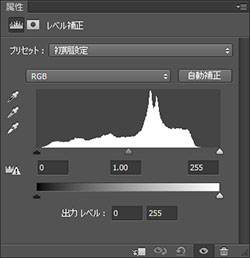 「属性」パネルに「レベル補正」画面が表示される
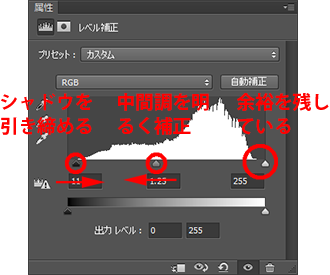
■STEP2 明るさを補正する
雪面が暗くくすんだ印象なので、明るく補正して白さを出す。その際、ハイライト(雪面)の質感が失せないように注意すること。白さを出したり、適正な露出にするのではなく、「補正しやすいベースを作る」と考え、雪面の微妙な濃淡を重視した明るさにしておく。
 補正前の状態
 雪面が白い平面にならないように注意
 中間調のスライダーで明るく補正
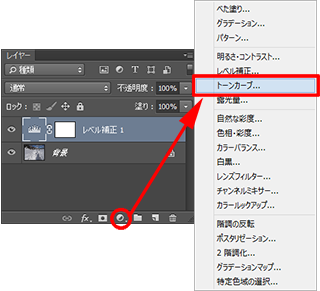
②雪面の質感を整える
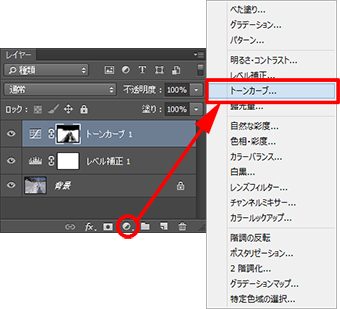
■STEP1 「トーンカーブ」を選択
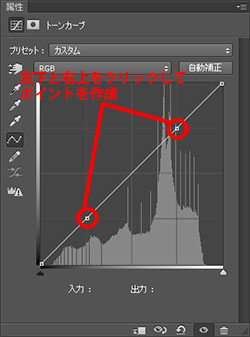
画面左右の滑らかな雪面は、暗めにコントラストを強めることで陰影を強調する。使う機能は調整レイヤーの「トーンカーブ」。「レイヤー」パネル下部の ![]() ボタンから「トーンカーブ」を選択し、線グラフの左下と右上に2つのポイントを作成しておく。
ボタンから「トーンカーブ」を選択し、線グラフの左下と右上に2つのポイントを作成しておく。
 「属性」パネルに「トーンカーブ」画面が表示される
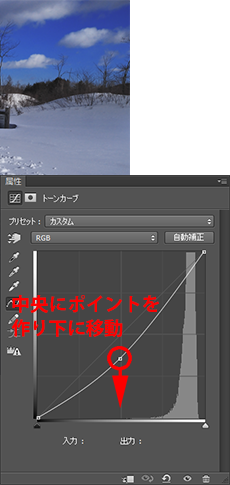
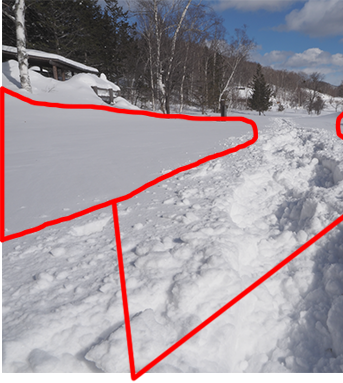
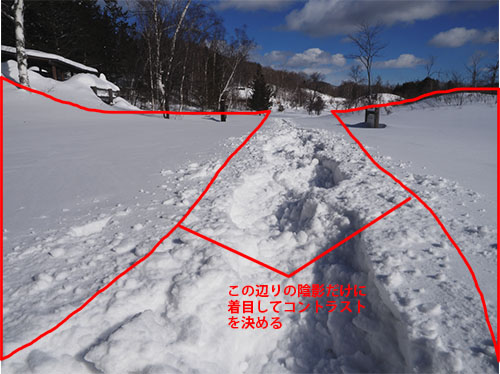
■STEP2 雪面に陰影を出す
画面左右に広がる平坦な雪面に対して、陰影をつけて平面的にならないように補正する。コントラストを強めるようにシャドウを濃くすればOK。必要に応じてハイライトも微調整し、輝度差を出しておくとよい。全体的に色調が調整されるが、部分補正で範囲を制限するので気にする必要はない。
 補正前の状態
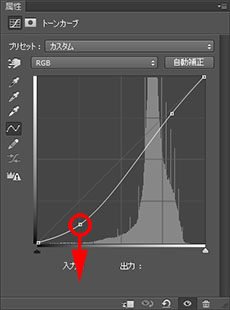
左下のポイントを下げて、シャドウを暗く補正して雪面の陰影を強める
■STEP3 部分補正の準備
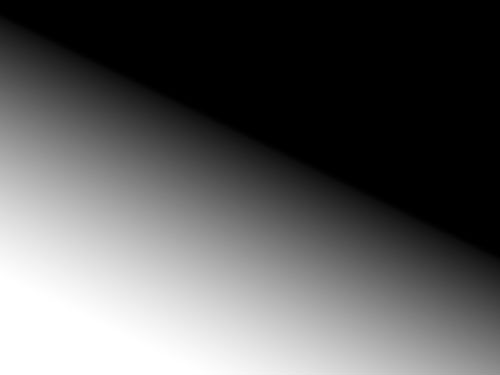
このままでは画面全体に補正が適用されているので、左右の雪面だけが補正されるように範囲を制限する。レイヤーマスクを使い、補正しない部分を「黒」で塗りつぶせばよいのだが、作業しやすいように全体の補正を透過させて(補正前の状態にして)から、必要な範囲に対して補正が行えるようにする。この作業は、下の要領でレイヤーマスクを黒で塗りつぶせばOK。
 レイヤーマスク描画前の状態
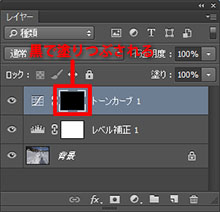
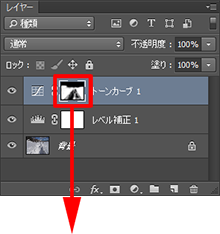
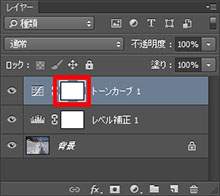 「トーンカーブ」調整レイヤーの「レイヤーマスクサムネール」をクリックして選択
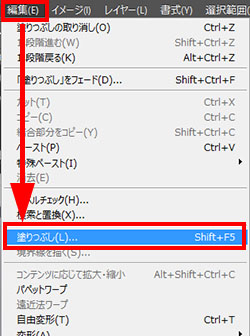
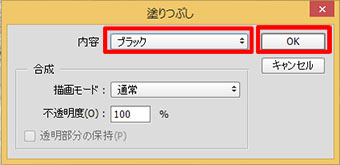 「編集」メニューの「塗りつぶし」を選択したら、「塗りつぶし」画面で「内容」を「ブラック」に設定して「OK」ボタンをクリック
 「レイヤーマスクサムネール」が黒で塗りつぶされ、写真は補正前の状態が表示される
≪ワンポイント≫
■「塗りつぶし」のショートカット
キーボードのAlt(MacはOption)キーを押しながらDelキーを押すと「描画色」で、Ctrl(MacはCommand)キーを押しながらDelキーを押すと「背景色」で塗りつぶすことができる。
■STEP4 「ブラシツール」を設定する
レイヤーマスクに描画するための「ブラシツール」を設定する。ツールパネルの①描画色を「白」に設定したら、②「ブラシツール」をクリックして選択。ブラシの形状はボケ足のあるタイプが適しているので、③「ブラシプリセットピッカー」をクリックし、④「ソフト円ブラシ」に設定。ブラシの太さは、作業する部分に合わせて⑤「直径」スライダーで調整しておく。⑥「不透明度」と⑦「流量」はどちらも「100%」にする。
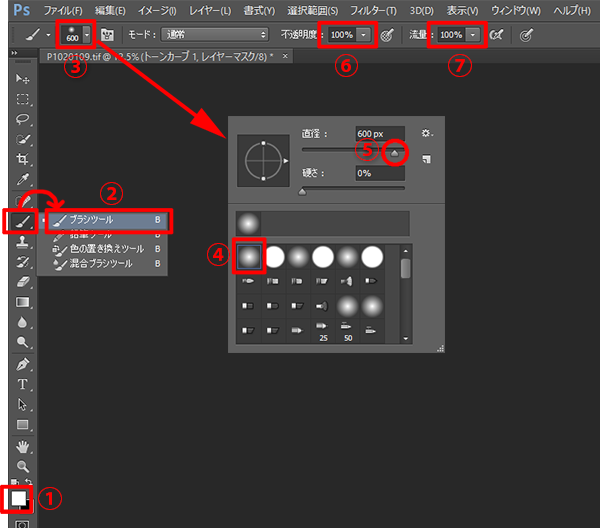 描画色が「白」のブラシを設定する
■STEP5 部分的に補正を適用する
「レイヤーマスク」に対して、「白」に設定したブラシで「補正したい部分」(左右の雪面)をドラッグして描画する。これで補正された状態になり、雪面部分のコントラストだけが強められる。「黒」のブラシで描画すると補正が取り消され、「グレー」なら半透明(弱める)にすることができるので、ブラシの色を調整して自然な色調に仕上げていく。
 レイヤーマスク描画前の状態
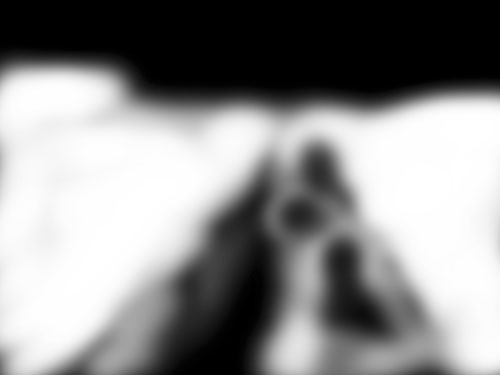
「レイヤーマスクサムネール」には描画した濃淡が記録される
③空の露出を補正する
■STEP1 「トーンカーブ」を選択
空の露出も、作業自体は②と同じ。調整レイヤーの「トーンカーブ」を使い、空の範囲だけ補正を適用すればよい。まずは、「レイヤー」パネル下部の ![]() ボタンから「トーンカーブ」を選択し、線グラフの左下と右上に2つのポイントを作成しておこう。
ボタンから「トーンカーブ」を選択し、線グラフの左下と右上に2つのポイントを作成しておこう。
 「属性」パネルに「トーンカーブ」画面が表示される
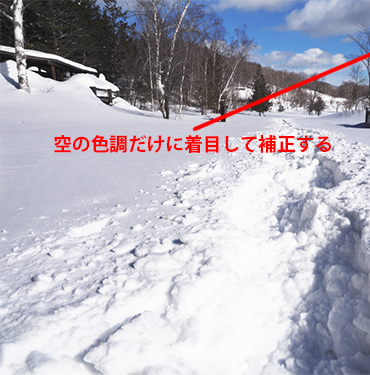
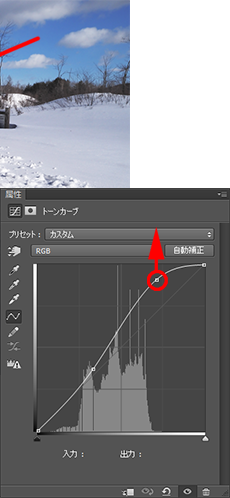
■STEP2 空の露出を補正する
空の範囲だけに着目して、「トーンカーブ」で露出を調整。作例はヌケのよい青空にするため、ハイライト(右上のポイント)を上に移動してハイライトを重点的に明るく補正。必要に応じてシャドウ(左下のポイント)も調整し、イメージする青空を再現する。
 補正前の状態
 右上のポイントを上げて明るくし、ハイライトのヌケをよくする
■STEP3 部分補正の準備
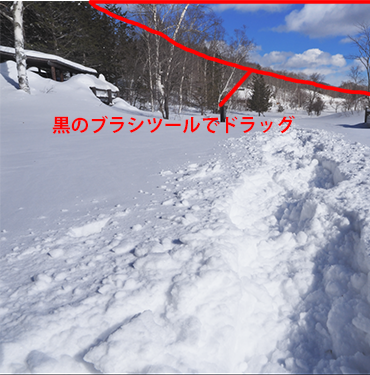
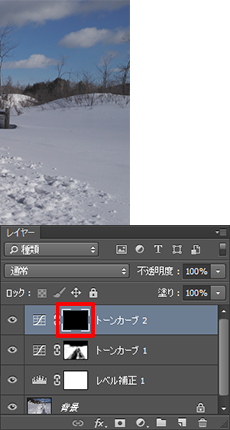
補正したいのは画面右上付近の青空の範囲なので、「レイヤーマスク」を使い補正の範囲を制限する。レイヤーマスクに対して補正しない部分を「黒」で塗りつぶしてもよいのだが、それだと塗りつぶす範囲が広いため、まずはレイヤーマスク全体を「黒」で塗りつぶしてから補正したい範囲を「白」で塗りつぶしていく。作業は、②のSTEP3と同様。
 レイヤーマスク描画前の状態
 「トーンカーブ」の「レイヤーマスクサムネール」をクリックして選択
 補正前の状態が表示される
 「編集」メニューの「塗りつぶし」でレイヤーマスクを「黒」で塗りつぶす
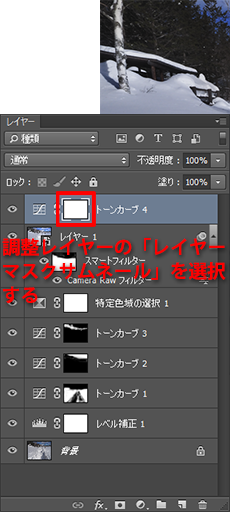
■STEP4 部分的に補正を適用する
②のSTEP4の要領で描画色が「白」のブラシツールを設定したら、画面右上の青空の範囲に対して白いブラシで描画する。このとき、「レイヤーパネル」で空を補正した「トーンカーブ」調整レイヤーの「レイヤーマスクサムネール」を選択した状態にしておくこと。
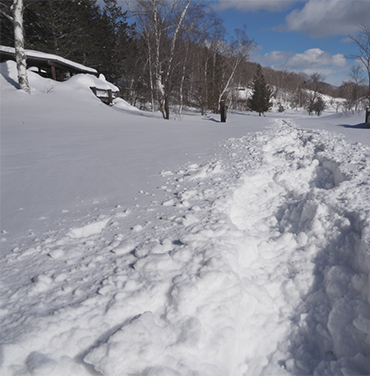 レイヤーマスク描画前の状態
 部分補正を行なう「レイヤーマスクサムネール」をクリックして選択
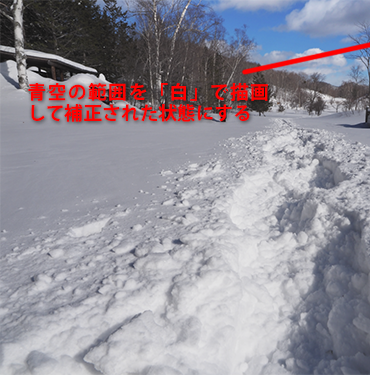 「白」に設定したブラシツールで補正する範囲をドラッグして塗りつぶす

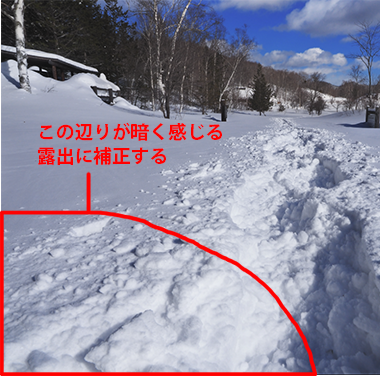
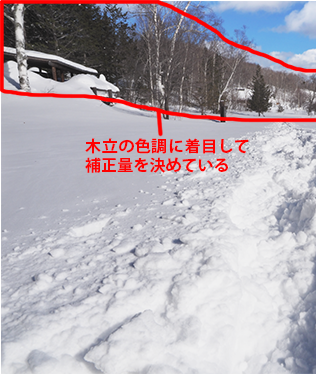
④木立を補正する
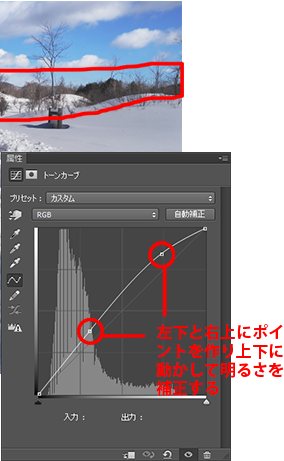
■STEP1 「トーンカーブ」で補正する
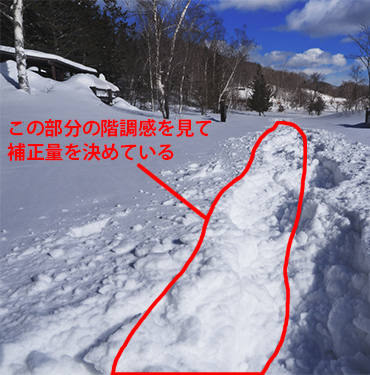
空の明るさに合わせて、暗く沈んだ背後の木立の露出も整える。この作業も②や③と同様で、調整レイヤーの「トーンカーブ」を使い部分補正すればOK。トーンカーブの左下と右上にポイントを作り、写真を見ながらそれぞれのポイントを上下に移動して露出を決める。
 補正前の状態
 トーンカーブで明るく補正
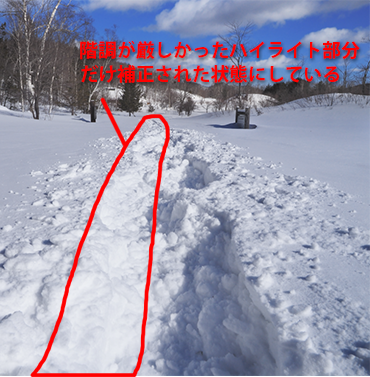
■STEP2 補正の範囲を制限する
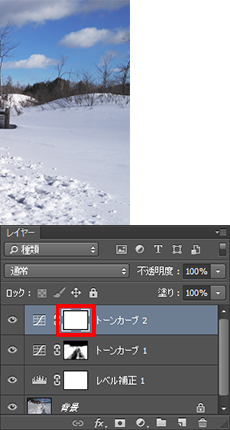
STEP1の補正を木立の部分だけに制限するには、②のSTEP3、4と同様に「レイヤーマスクサムネール」を「黒」で塗りつぶしてから、描画色を「白」に設定したブラシツールで補正したい範囲を塗りつぶすと簡単。
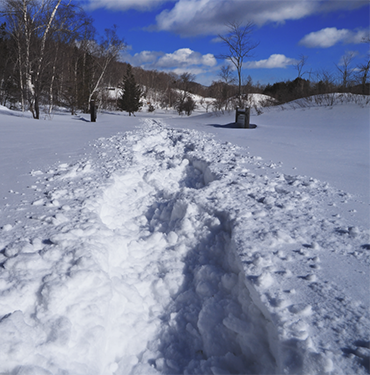
 レイヤーマスク描画前の状態
 木立の部分だけ補正された状態にする
 描画中は「レイヤーマスクサムネール」を選択した状態にしておく
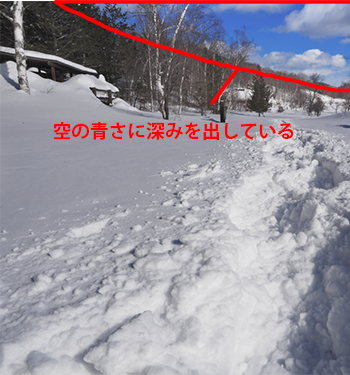
⑤空の色を補正する
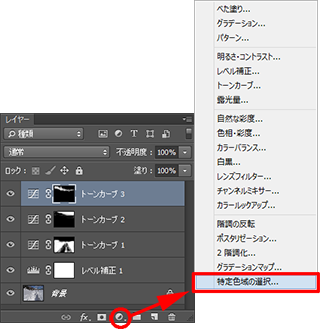
■STEP1 「特定色域の選択」を選択
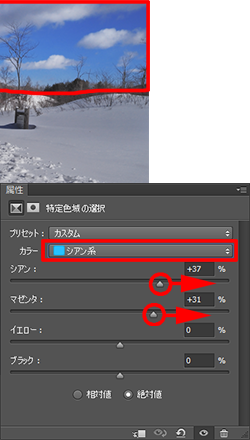
空の青さを際立たせるため、調整レイヤーの「特定色域の選択」で補正する。「レイヤー」パネル下部の ![]() ボタンから「特定色域の選択」を選択し、補正画面の下部にある「絶対値」を選択。
ボタンから「特定色域の選択」を選択し、補正画面の下部にある「絶対値」を選択。
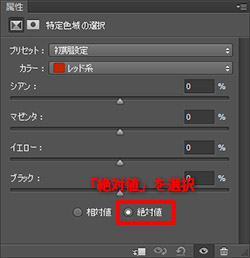 「属性」パネルに「特定色域の選択」画面が表示される
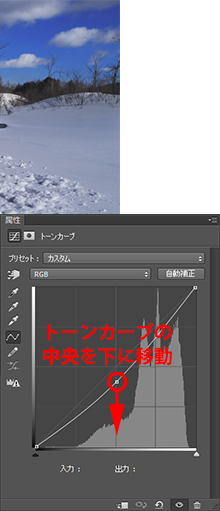
≪ワンポイント≫
■「特定色域の選択」とは
指定した色の系統(レッド系やブルー系など9系統)に対して、「カラーバランスとブラックの濃度」が補正できる機能。色別に補正できるため、補正する場所を「面」で制限する「レイヤーマスク」では難しい緻密で繊細な部分に対しても、適切な補正が施せる。「特定色域の選択」画面の下部にある「相対値」と「絶対値」は補正の効き方の設定で、相対値を選ぶと色の成分(RGBの数値)に対しての割合で(繊細な調整に適している)、絶対値を選ぶと指定した量で色の成分が増減できる(強めの効果が得られる)。